

Wobbly Sunflower Tutorial
/


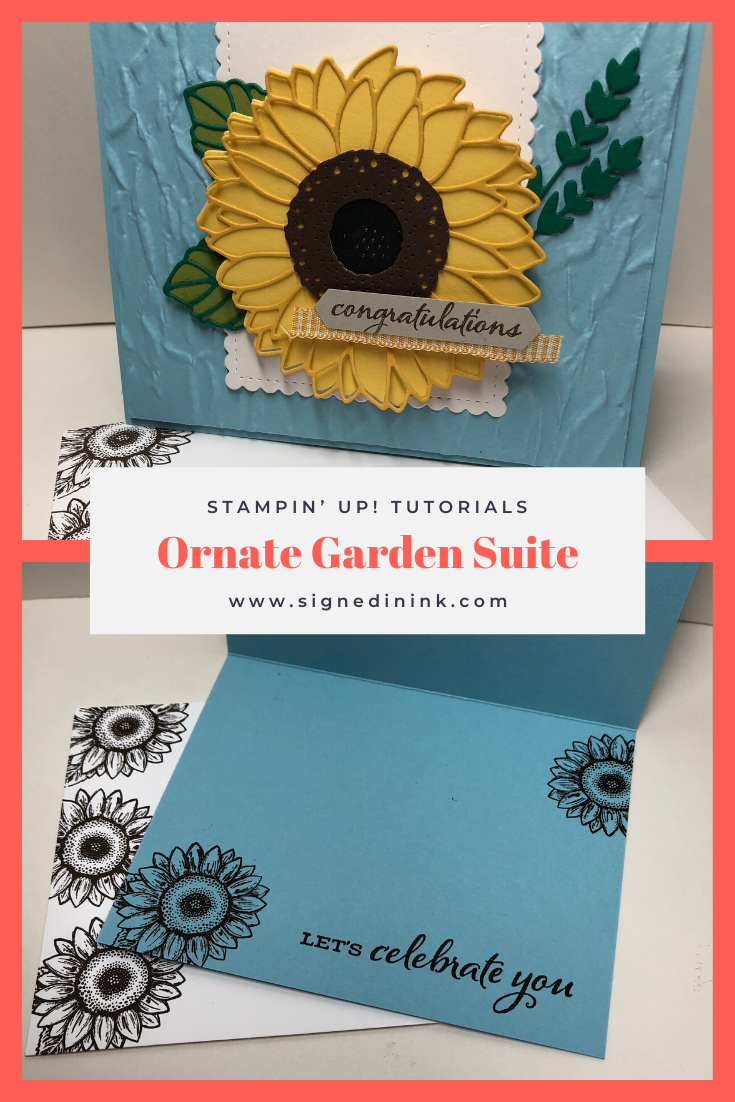
I’m back with another card using the Wobble! You can grab a pack of them by searching “Hampton Art Mini Action Wobbles.” These are such fun additions to a card and I’m really loving them! This sunflower card is so cute for the summertime, and it could easily be adapted with different colors to lead into Fall. If you would like a PDF printout tutorial of this card, click on “The Vault” in the navigation bar and follow the instructions. Inside The Vault, you’ll see the PDF for this card as well as my backlog of PDF tutorials!
Enjoy!
Project Materials
Stamp Set: Celebrate Sunflowers
Ink Pad: Early Espresso
Stampin’ Write Marker: Early Espresso
Die: Sunflowers Die
Embossing Folder: Old World Paper 3D
Cardstock:
Balmy Blue: 5 ½” x 8 ½” score @ 4 ¼”, 4” x 5 ¼” for the embossed layer.
Shimmery White: 3 ¼” x 4 ¼” for Stitched So Sweetly Die.
Old Olive: 2 ½” x 2 ½” for leaves.
Shaded Spruce: 3 ½” x 2” for vein leaves and stem of leaves.
Daffodil Delight: 3 ½” x 3 ½” for Sunflower base.
Bumblebee: 3 ½” x 3 ½” for Sunflower veins.
Early Espresso: 2” x 2” for the center of Sunflower.
Basic Black: 1” x 1” for the flower center.
Sahara Sand: Scrap for Sentiment.
Ribbon: Bumblebee Gingham 4” Ribbon
Envelope: Whisper White
Tools: Stitched So Sweetly die, Classic Label Punch, Paper Snips, Fine Tip glue or Multipurpose Liquid Glue, Mini Dimensionals, Dimensionals, Stampin’ Seal p. 162, Whisper White Envelope, Hampton Art Mini Action Wobble (ordered from Amazon)
Instructions
Using Old World Paper 3D embossing folder, emboss the 4” x 5 ¼” Balmy Blue.
Using Shimmery White cardstock, cut out the largest scalloped rectangle from Stitched So Sweetly Die.
Using Stampin’ Seal, layer the scalloped rectangle with a portion off the embossed Balmy Blue. Cut off the edge of the rectangle hanging off the Balmy blue.
Adhere the embossed layer to base of card with Stampin’ Seal.
Using Leaves from Sunflower die, cut out of Old Olive cardstock.
Using Vein Leaves and stem from Sunflower die, cut out of Shaded Spruce.
Using Sunflower die base, cut out of Daffodil Delight.
Using Sunflower die veins, cut out of Bumblebee.
Using Sunflower die veins, cut out center of flower with Early Espresso. Trim excess veins to create the center of the flower.
Using center circle die from Sunflower die, cut out of Basic Black.
Using Fine Tip Glue or Multipurpose glue, add veins to leaves. Set aside to dry.
Adhere with Stampin’ Seal, the black center to sunflower base.
Adhere with Stampin’ Seal, the Early Espresso circle to sunflower veins.
Adhere with Stampin’ Seal, sunflower veins to sunflower base.
Adhere the Wobble to middle of sunflower. Adhere sunflower to center of rectangle.
Adhere leaves under the sunflower.
With Early Espresso marker, “color” the congratulations word from Celebrate Sunflowers Stamp set. Stamp onto Sahara Sand cardstock. Punch out with Classic Label punch. Add Stampin’ Seal to back of label. Add Bumblebee Gingham ribbon. Trim as needed. Add mini dimensionals to back of label. Adhere to card.
Inside card and on whisper white envelope, using Early Espresso ink pad stamp small sunflower from Celebrate Sunflowers stamp set.
Stamp sentiments from Celebrate Sunflowers with Early Espresso.
Mail to a friend or loved one.
Pin this blog post!
Thank you for viewing this tutorial! As always, don’t forget to tag me on social media if you make this card. Have a wonderful week and stay safe!


